
ALUME Journal • Studio Apartment Decorating
A studio apartment doesn't need walls to feel like separate rooms. It needs zones — defined by rugs, furniture placement, lighting, and a few pieces that do double duty.
Disclosure: This page contains affiliate links. Alume may earn a small commission at no extra cost to you. Recommendations are selected for the edit, not the commission.
Why Studios Feel Like One Big Room
The problem with most studio apartments isn't the size — it's the absence of visual boundaries. When the bed, the sofa, and the desk all exist in the same undivided space with nothing separating them, the apartment reads as a storage unit rather than a home. Every function competes with every other function for the same visual territory.
Zoning solves this. Not by adding walls — which would shrink the space and require landlord permission — but by using furniture, rugs, lighting, and textiles to signal that different parts of the room serve different purposes. A well-zoned studio feels like a one-bedroom apartment. A poorly zoned one feels like a very expensive hotel room with a bed shoved in the corner.
The five methods below work in any studio, regardless of size or layout. They can be used individually or combined. Start with Method 1 and build from there.
The Rug Zone
THE MOST IMPORTANT METHOD
A rug is the most powerful zoning tool in a studio apartment. It doesn't divide space — it defines it. Place an 8×10 seagrass rug in the area you want to be the living zone. Everything inside the rug is the living room. Everything outside it is something else. That distinction alone transforms how the entire space reads.
The rug works because it creates a floor-level boundary the eye immediately recognizes. You don't need to think about it — you feel it. The moment you step onto the rug, you're in the living room. The moment you step off it, you're somewhere else. That transition is what makes a studio feel like more than one room.
The Sofa Back Divider
THE STRUCTURAL METHOD
The back of a sofa is the most underused surface in a studio apartment. When positioned correctly — floating away from the wall, facing into the living zone — the sofa back creates a visual wall that separates the living area from whatever is behind it. It doesn't block sight lines, but it signals a boundary the eye respects.
In practice: the sofa faces into the living zone (toward the coffee table, the rug, the arc lamp). Its back faces the sleeping zone or the work zone. The two areas share the same room but feel separate because the sofa back acts as a room divider. This is the Zone Stack layout — one piece of furniture doing the work of a wall.
The Lighting Boundary
THE ATMOSPHERE METHOD
Light creates zones more effectively than almost any physical object. An arc floor lamp positioned behind the sofa corner marks the living zone's boundary with warm light. Wherever the lamp's light falls, that's the living room. Outside its reach, a different kind of light — a bedside lamp, a desk lamp — marks the next zone.
The key is keeping each zone's lighting source distinct and warm. Overhead lighting destroys this — it illuminates everything equally and flattens the entire apartment into one undifferentiated space. Turn the overhead off. Let each zone have its own warm light source at a different height. The apartment will feel like three separate rooms.
The Curtain Partition
THE FLEXIBLE METHOD
A ceiling-mounted curtain rod with a sheer linen curtain panel creates a soft, temporary wall between two zones without blocking light or making the apartment feel smaller. When open, the curtain hangs to one side and the zones share the space. When closed, the sleeping zone disappears entirely behind a wall of soft linen.
This works especially well between the sleeping zone and the living zone in a studio where the bed is visible from the main entry. A linen curtain hung at ceiling height and drawn across the bed creates a soft partition that reads as intentional design rather than improvised privacy.
The Mirror Depth Trick
THE SPACE EXPANSION METHOD
A large floor mirror leaned against the wall at the edge of the living zone does two things: it reflects the zone back into itself, making it feel larger, and it creates a visual boundary between the living zone and whatever is behind the mirror's reflection. The mirror doesn't divide the space — it expands it.
Place the mirror opposite the living zone's main light source — the window or the arc lamp. It will reflect that light back into the zone, doubling the perceived brightness and depth.
How to Combine the Methods
Most well-zoned studios use at least three of the five methods simultaneously. The rug defines the living zone floor. The sofa back divides it from the sleeping zone. The arc lamp marks its upper boundary with warm light. The curtain creates flexible privacy. The mirror expands the perceived depth of the whole arrangement.
Start with the rug and the sofa position — those two decisions account for about 80% of how well a studio zones. Once those are set, add the lighting boundary. The curtain and mirror are refinements that amplify what the first three methods have already established.

Method 1 — The Rug Zone
Safavieh Natural Fiber Seagrass Rug 8×10
$248.89
The foundation of every living zone in a studio. Natural seagrass has a warm honey-brown tone and coarse woven texture that anchors the zone visually without competing with the furniture above it. At 8×10, it's large enough to have all front legs of the sofa and accent chair on it simultaneously — the exact requirement for the zone to read as intentional.

Method 2 — The Sofa Back Divider
Weture 108" Modular Cloud Sectional
$379.99
The modular configuration makes this the ideal zone divider. Float it away from the wall with the sofa face toward the living zone and the back facing the sleeping zone. The deep cloud cushions give the sofa back enough visual presence to read as a room boundary rather than just the rear of a piece of furniture. One piece, two zones.

Method 3 — The Lighting Boundary
Brightech Sparq Arc Floor Lamp
$249.99
The arc lamp is the upper boundary of the living zone. Positioned behind the sofa corner, it arcs over the seating area and casts warm light downward into the zone without taking floor space within it. Wherever its light falls, that's the living room. The cylindrical shade casts diffused warm light — no harsh upward glare, no dome shadow, no overhead effect.

Method 4 — The Curtain Partition
Linen Curtain Panels — White
$33.99
Hung at ceiling height on a tension or ceiling-mounted rod, these sheer linen panels create a soft partition between the sleeping zone and the living zone. The linen diffuses light rather than blocking it — the apartment stays bright when the curtain is drawn, and the sleeping zone gains complete visual privacy. When open, the panels pool softly to one side and disappear into the room.
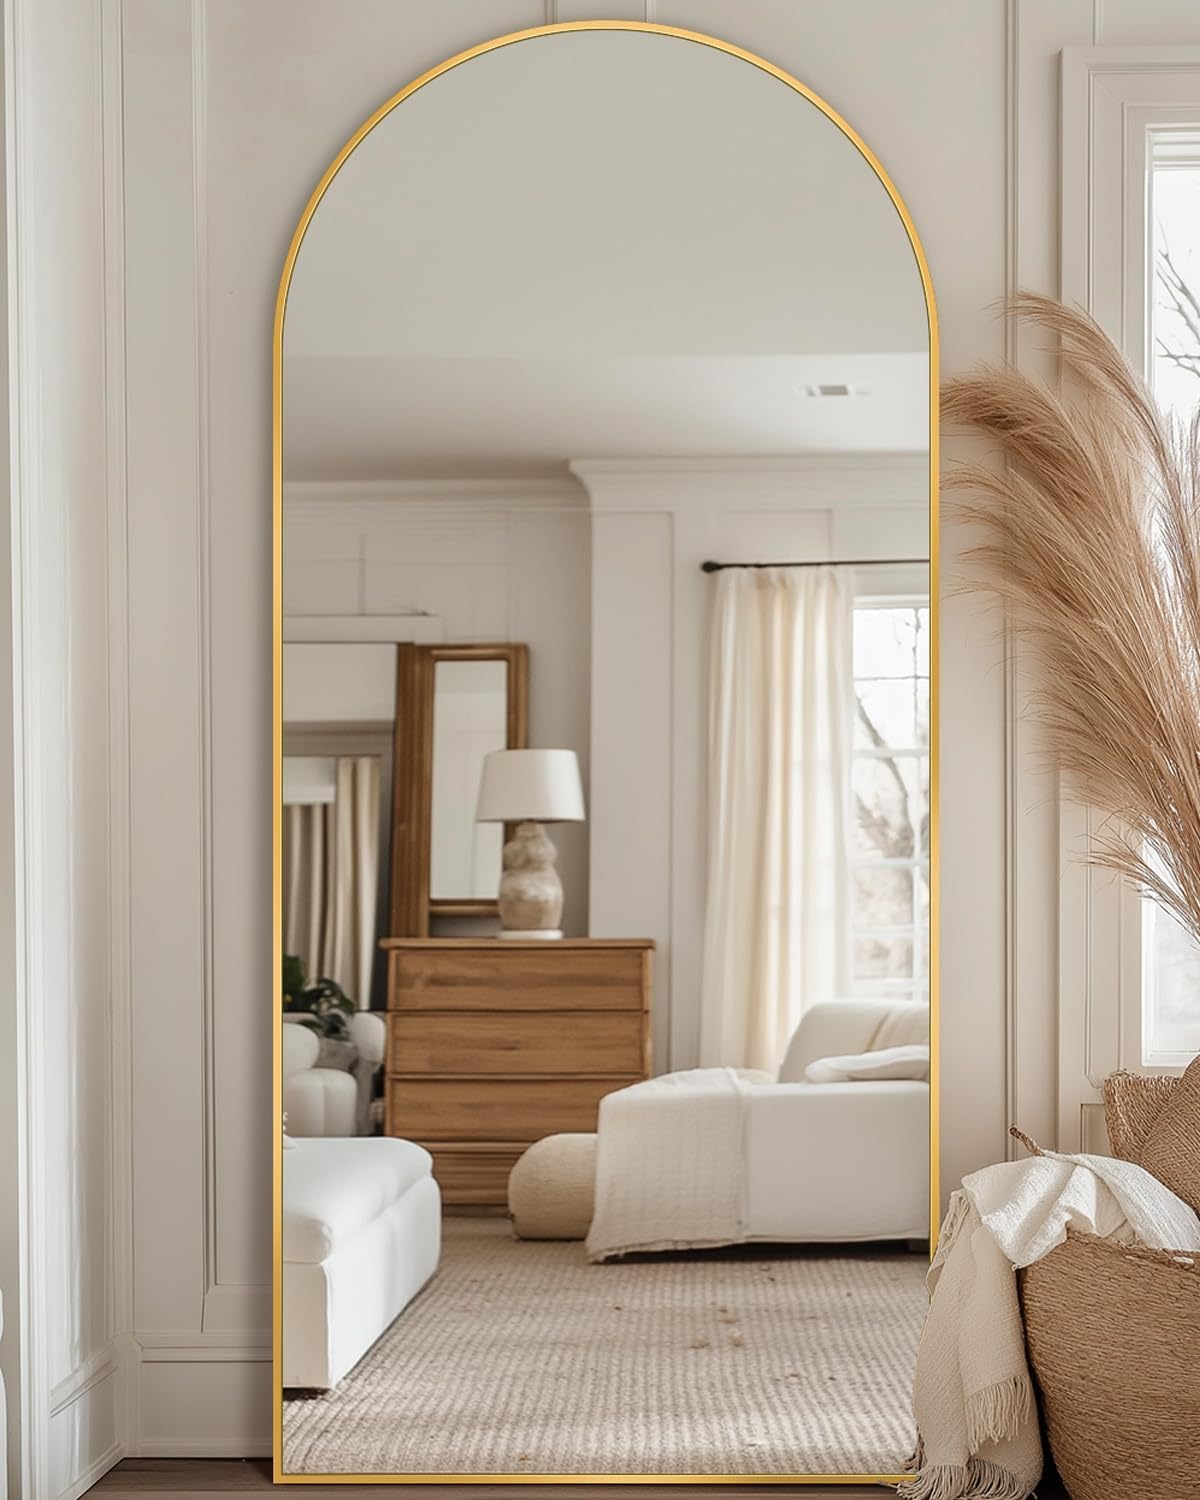
Method 5 — The Mirror Depth Trick
Arched Floor Mirror — Gold Frame, 65"
$39.99
Leaned at the edge of the living zone opposite the main light source, this mirror reflects the entire zone back into itself. The living area appears twice as deep, the zone feels larger and more distinct, and the studio gains the sense of depth that makes it feel like more than one room. Lean it — don't hang it. The leaned position reads as intentional styling rather than functional necessity.

Sleeping Zone Light Layer
PARTPHONER Ceramic Table Lamps, Set of 2
$69.99
The sleeping zone needs its own distinct light source — separate from the arc lamp that marks the living zone. A ceramic table lamp on the nightstand at a lower height creates a warm, contained pool of light that signals a different kind of space. The matte ceramic base reads as considered next to a warm neutral palette, and the warm bulb completes the layered lighting approach that keeps the overhead off permanently.

Living Zone Surface Styling
CEMABT White Ceramic Vase Set of 3
$19.99
Once the living zone is defined, the coffee table needs styling that confirms the zone is complete and intentional. Three heights, one material, one arrangement: tall vase with a dried stem, medium vase left empty, small vase beside a stack of books. The matte white ceramic reads as calm and considered against a warm neutral palette — exactly what a living zone needs to feel settled rather than staged.
The Order to Do It
Start with the rug. Place it where the living zone will be before moving any furniture. Everything else orients around it. Float the sofa with its back toward the sleeping zone. Position the arc lamp behind the sofa corner. If you want a curtain partition, install the rod at ceiling height before placing the bed behind it. Lean the mirror at the edge of the living zone last — it should reflect the finished zone, not the work in progress.
The whole process takes an afternoon. The result is a studio that feels like a designed home rather than an undifferentiated space. Guests will ask which wall you removed.
Related: Studio Decor
Once the zones are set, the next step is making each one feel complete. The studio decor guide covers the ten pieces that make a studio look designed rather than temporary — in the order you'd buy them.
Studio Apartment Decor Ideas That Don't Look Cheap →Next in Journal
Some links in this page may be affiliate links — Alume may earn a small commission at no extra cost to you. Recommendations are selected for the edit, not the commission.